
Why Your Auto-Scaling App Logs Users Out (And How Redis Fixes It)
Shiv Srivastava
Product Architect · AdvikPrep
Why Your Auto-Scaling App Logs Users Out (And How Redis Fixes It)
A hands-on demo with Node.js, Docker, AWS Load Balancer, Auto Scaling and Redis.
The Big Picture
Imagine a shop with one counter and one helper. The helper remembers every customer by name. Business grows, so you hire two more helpers. Now a customer talks to helper A, comes back, and gets helper B. Helper B has never seen this customer. "Who are you? Let's start again."
This is exactly what happens to web apps when they scale out.
- A session is the app's short memory of one user (logged in, items in cart, page visits).
- If each server keeps sessions in its own memory, the memory is not shared.
- When the load balancer sends the user to a different server, the session is gone. The user looks logged out.
In this tutorial we will:
- Build a small Node.js app that counts your page visits.
- Put it in a Docker container and run it on several AWS servers behind a load balancer.
- See the bug live: the counter keeps resetting to 1.
- Fix it in two ways: sticky sessions (quick fix) and Redis (the real fix).
What we will build
Here is the whole flow in simple words:
- The user opens the ALB (Application Load Balancer) URL.
- The ALB picks one of the EC2 servers for each request.
- Each EC2 server runs our app inside a Docker container.
- The Auto Scaling Group (ASG) adds or removes servers when traffic changes.
- In the fixed version, all servers save sessions in one shared Redis.
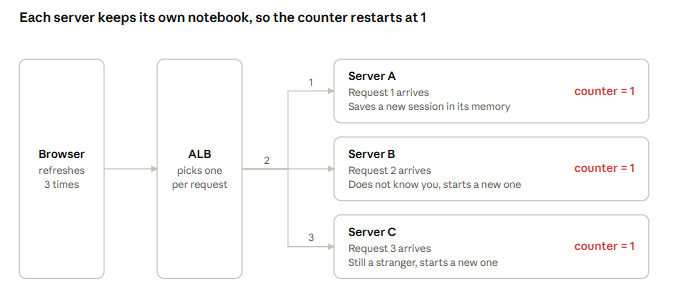
A user's request reaches the load balancer, which hands it to any one server in the group. In the fixed version, all servers also save sessions in one shared Redis.
Words you will hear in this article
- ALB: a traffic police officer. It receives all user requests and sends each one to a server.
- EC2: a virtual computer in AWS. Our app runs here.
- ASG (Auto Scaling Group): a manager that adds more servers when busy and removes them when quiet.
- Docker image: our app packed in a box, so it runs the same everywhere.
- Redis (ElastiCache): a very fast shared notebook that every server can read and write.
- CDK: we write our AWS setup as TypeScript code instead of clicking in the console.
Step 1: Build the Node.js App
We will make a tiny app that counts how many times you visited the page.
mkdir session-demo && cd session-demo
npm init -y
npm install express express-session
The code below uses import, so open package.json and add this line:
"type": "module"
Now create app.js:
import os from "os";
import express from "express";
import session from "express-session";

const app = express();

// Sessions are stored in the server's own memory.
// This is what causes the bug when we have many servers.
app.use(session({
  secret: "my-super-secret-key",
  resave: false,
  saveUninitialized: true,
  cookie: { maxAge: 60000 }, // session lives for 1 minute
}));

app.get("/", (req, res) => {
  // Count how many times this user opened the page
  req.session.views = (req.session.views || 0) + 1;

  const host = os.hostname(); // unique name of the server/container
  console.log(`[${new Date().toISOString()}] handled by ${host}, views=${req.session.views}`);

  res.set("X-Server", host);
  res.send(`Visited ${req.session.views} times. (Server: ${host})`);
});

app.listen(3000, () => console.log("App running on port 3000"));
We show the server name (os.hostname()) on purpose. Later it will help us see which server answered each request.
Step 2: Pack the App in Docker
Docker puts our app and everything it needs in one box, so it runs the same on your laptop and on AWS.
Create a file named Dockerfile:
FROM node:24.12.0-alpine

# Update the OS packages to fix known security issues
RUN apk update && apk upgrade --no-cache

WORKDIR /app
COPY package*.json ./
RUN npm install
COPY . .
EXPOSE 3000
CMD ["node", "app.js"]
Build and test it on your laptop:
docker build -t your-dockerhub-username/my-session-app:v1 .
docker run -p 3000:3000 your-dockerhub-username/my-session-app:v1
Open http://localhost:3000 and refresh a few times. The counter goes up nicely. With one server, everything works. Remember this, because it is the "before" picture.
Apple Silicon (M1/M2/M3) users: AWS
t3.microis an x86 machine. Build for it with:docker buildx build --platform linux/amd64 -t your-dockerhub-username/my-session-app:v1 --push .
Step 3: Push the Image to Docker Hub
AWS servers need to download our image from somewhere. We will use Docker Hub.
- Create a free account at hub.docker.com and note your username.
- Click Repositories → Create Repository, name it
my-session-app, and choose Public. A public repo is the easiest because the servers can pull it without a password. - Log in from your terminal (a browser window may open, or use a Personal Access Token instead of your password):
docker login
- Push the image:
docker push your-dockerhub-username/my-session-app:v1
If you built the image without your username in the name, tag it first:
docker tag my-session-app:v1 your-dockerhub-username/my-session-app:v1
Step 4: Create the AWS Setup with CDK
Before you start: set up your AWS access
CDK talks to AWS on your behalf, so it needs an identity with permission to create things. Let's set that up first, so every learner starts from the same working point.
There are two different identities in this tutorial. Do not mix them up:
- You (an IAM user): the person running
cdk deployfrom your laptop. You create this one now, by hand. - The server role (an IAM role): the
InstanceSSMRolein our stack code. CDK creates it for you, so you do not create it by hand. It lets the EC2 servers use SSM.
What you need installed
node --version              # Node.js 18 or newer
aws --version               # AWS CLI v2
npm install -g aws-cdk      # the CDK command line
cdk --version
1. Use a safe AWS account
Use a personal or sandbox AWS account, never a company production account. Never use the root user for daily work. Sign in as root only once to create your own user, and turn on MFA for root (Security credentials → Assign MFA device).
2. Create an IAM user for CDK
- Open the AWS console and go to IAM → Users → Create user.
- User name:
cdk-learner. You do not need console access for this user, so leave that box unticked. - On the permissions page choose Attach policies directly, search for AdministratorAccess, and tick it.
- Click Create user.
Why AdministratorAccess? The first CDK step (cdk bootstrap) creates roles, storage buckets and more, and the stack itself creates a VPC lookup, security groups, a load balancer, an Auto Scaling Group, an IAM role and Redis. A custom policy for all of that is long and easy to get wrong while learning. It is fine for a sandbox account. For real projects, an admin runs cdk bootstrap once, and day-to-day users only get permission to assume the CDK roles that bootstrap creates (their names start with cdk-).
3. Create an access key for the command line
- Open the new user, then Security credentials → Create access key.
- Choose Command Line Interface (CLI), confirm, and click Create access key.
- Copy the Access key ID and Secret access key, or download the
.csvfile. The secret is shown only once.
Keep it safe: never paste these keys into code, a README or GitHub. When you finish the demo, delete the access key (or the whole user).
Prefer not to use long-lived keys? AWS IAM Identity Center (SSO) is the recommended way for teams: run aws configure sso and follow the prompts. The rest of this article works the same, you just use the SSO profile name.
4. Save the keys as a named profile
aws configure --profile cdk-learner
It asks four questions:
- AWS Access Key ID: paste the key from step 3
- AWS Secret Access Key: paste the secret
- Default region name: a region close to you, for example
us-east-1 - Default output format:
json
This cdk-learner name is what we pass to --profile in the commands below.
5. Check that it works
aws sts get-caller-identity --profile cdk-learner
You should see JSON with your 12-digit Account number and an Arn ending in user/cdk-learner. If you see an error instead, re-check the keys. If it works, you are ready.
6. Bootstrap CDK once per account and region
Bootstrap creates a few helper resources (a storage bucket and roles) that CDK needs before the first deploy:
cdk bootstrap aws://<account-id>/<region> --profile cdk-learner
Use the account number from step 5 and the same region as step 4. You only do this once for each account and region pair.
What we will build in this step
Here is what we will create:
- Two security groups (firewalls): one for the ALB (open to the internet on port 80), one for the servers (only the ALB can reach port 3000).
- An Application Load Balancer that spreads the traffic.
- A Launch Template: the recipe for a server (Amazon Linux, installs Docker, runs our image).
- An Auto Scaling Group that keeps 1 to 4 servers running and adds more when traffic grows.
Create the project:
mkdir my-session-app-cdk && cd my-session-app-cdk
cdk init app --language typescript
The stack looks up the default VPC, so it needs to know your account and region. In bin/*.ts set:
env: { account: process.env.CDK_DEFAULT_ACCOUNT, region: process.env.CDK_DEFAULT_REGION },
Now the stack file (lib/*-stack.ts):
import * as cdk from "aws-cdk-lib";
import { Construct } from "constructs";
import * as ec2 from "aws-cdk-lib/aws-ec2";
import * as elbv2 from "aws-cdk-lib/aws-elasticloadbalancingv2";
import * as autoscaling from "aws-cdk-lib/aws-autoscaling";
import * as iam from "aws-cdk-lib/aws-iam";

export class MySessionAppCdkStack extends cdk.Stack {
  constructor(scope: Construct, id: string, props?: cdk.StackProps) {
    super(scope, id, props);

    // Use the default VPC (the network that already exists in your account)
    const vpc = ec2.Vpc.fromLookup(this, "DefaultVpc", { isDefault: true });

    // 1. Security groups (firewalls)
    const albSg = new ec2.SecurityGroup(this, "AlbSg", {
      vpc,
      description: "ALB Security Group",
      allowAllOutbound: true,
    });
    albSg.addIngressRule(ec2.Peer.anyIpv4(), ec2.Port.tcp(80), "Allow HTTP from anywhere");

    const webSg = new ec2.SecurityGroup(this, "WebSg", {
      vpc,
      description: "Web EC2 Security Group",
      allowAllOutbound: true,
    });
    // Only the load balancer may talk to our servers on port 3000
    webSg.addIngressRule(albSg, ec2.Port.tcp(3000), "Allow port 3000 from ALB");

    // 2. IAM role, so we can open a shell on servers with SSM (no SSH keys needed)
    const ssmRole = new iam.Role(this, "InstanceSSMRole", {
      assumedBy: new iam.ServicePrincipal("ec2.amazonaws.com"),
    });
    ssmRole.addManagedPolicy(
      iam.ManagedPolicy.fromAwsManagedPolicyName("AmazonSSMManagedInstanceCore")
    );

    // 3. Load balancer and target group
    const alb = new elbv2.ApplicationLoadBalancer(this, "WebAlb", {
      vpc,
      internetFacing: true,
      securityGroup: albSg,
    });

    const listener = alb.addListener("Listener", { port: 80, open: true });

    const targetGroup = new elbv2.ApplicationTargetGroup(this, "WebTargetGroup", {
      vpc,
      port: 3000,
      protocol: elbv2.ApplicationProtocol.HTTP,
      targetType: elbv2.TargetType.INSTANCE,
    });
    listener.addTargetGroups("DefaultTarget", { targetGroups: [targetGroup] });

    // 4. Launch template: install Docker and run our image when a server starts
    const userData = ec2.UserData.forLinux();
    userData.addCommands(
      "dnf update -y",
      "dnf install -y docker",
      "systemctl start docker",
      "systemctl enable docker",
      "docker run -d -p 3000:3000 your-dockerhub-username/my-session-app:v1"
    );

    const launchTemplate = new ec2.LaunchTemplate(this, "WebLaunchTemplate", {
      machineImage: ec2.MachineImage.latestAmazonLinux2023(),
      instanceType: ec2.InstanceType.of(ec2.InstanceClass.T3, ec2.InstanceSize.MICRO),
      securityGroup: webSg,
      userData,
      role: ssmRole,
      associatePublicIpAddress: true, // needed to download the image from Docker Hub
    });

    // 5. Auto Scaling Group: between 1 and 4 servers
    const asg = new autoscaling.AutoScalingGroup(this, "WebAsg", {
      vpc,
      launchTemplate,
      minCapacity: 1,
      maxCapacity: 4,
      vpcSubnets: { subnetType: ec2.SubnetType.PUBLIC },
    });
    asg.attachToApplicationTargetGroup(targetGroup);

    // Scaling rules: add servers when the app is busy
    asg.scaleOnCpuUtilization("CpuScaling", { targetUtilizationPercent: 40 });
    asg.scaleOnRequestCount("RequestScaling", { targetRequestsPerMinute: 20 }); // very low on purpose, for the demo

    // Print the load balancer URL after deploy
    new cdk.CfnOutput(this, "LoadBalancerDns", {
      value: alb.loadBalancerDnsName,
      description: "The DNS URL of your application load balancer",
    });
  }
}
Deploy it:
cdk bootstrap --profile <profile-name>   # only the first time
cdk synth --profile <profile-name>
cdk deploy --profile <profile-name>
--profile is the name of the AWS profile you use. Make sure it has the right permissions. When the deploy finishes, CDK prints LoadBalancerDns. Copy it.
Tip: A server needs 2 to 3 minutes to start Docker and pass the health check. If the page shows an error at first, wait a little and try again.
Step 5: See the Bug Live
The ASG starts with 1 server, so first we need more than 1. There are two ways:
- Temporarily set
minCapacity: 2(ordesiredCapacity: 2) and deploy again, or - Create real load. One browser refresh is too small to trigger scaling, so use a load tool:
npx autocannon -c 100 -d 300 http://<ALB-DNS-NAME>
Scaling is not instant. AWS needs a few minutes to notice the traffic and start new servers. Watch it under EC2 → Auto Scaling Groups → Activity.
Once you have 2 or more servers:
- Open the ALB URL in your browser.
- Refresh a few times.
- The bug appears: the counter keeps jumping back to 1, and the server name keeps changing.
Why did this happen?
- By default, the ALB picks a server for every single request (round robin).
- Request 1 goes to Server A. It saves your session in its own memory and gives you a cookie.
- Request 2 goes to Server B. It does not know your cookie, so it starts a fresh session. Counter = 1.
- Request 3 goes to Server C. Same story.
Same browser, same cookie, but three servers with three separate notebooks. The counter restarts every time.
The browser also asks for /favicon.ico in the background, which uses up more turns. That is why you almost never see a 2.
How to prove the ALB is rotating requests
Run this in your terminal. Each request is independent, so you will see the server name rotate:
for i in {1..12}; do curl -s http://<ALB-DNS-NAME>; echo; done
Other ways to check:
- Open Session Manager (EC2 → Connect) on each server and run
sudo docker logs -f $(sudo docker ps -q). You will see requests arriving on different servers one by one. - In EC2 → Target Groups → Monitoring, look at
RequestCountPerTarget. Without stickiness it is almost equal across all servers.
Step 6: The Fixes
Option 1: Sticky Sessions (the quick fix)
Tell the ALB: "Send the same user to the same server every time." The ALB does this with its own cookie (AWSALB).
const targetGroup = new elbv2.ApplicationTargetGroup(this, "WebTargetGroup", {
  vpc,
  port: 3000,
  protocol: elbv2.ApplicationProtocol.HTTP,
  targetType: elbv2.TargetType.INSTANCE,
  stickinessCookieDuration: cdk.Duration.minutes(1),
});
Run cdk deploy. Now each browser keeps going to the same server and the counter climbs.
But this is only a band-aid:
- If the server is removed (scale-in) or crashes, the user loses the session.
- Traffic can become uneven, because some servers get heavier users.
- Tools like
curlthat do not keep cookies still get spread around.
Option 2: Shared Session Store with Redis (the real fix)
Instead of every server keeping its own notebook, we give all servers one shared notebook: Amazon ElastiCache (Redis). Now it does not matter which server answers. They all read the same session.
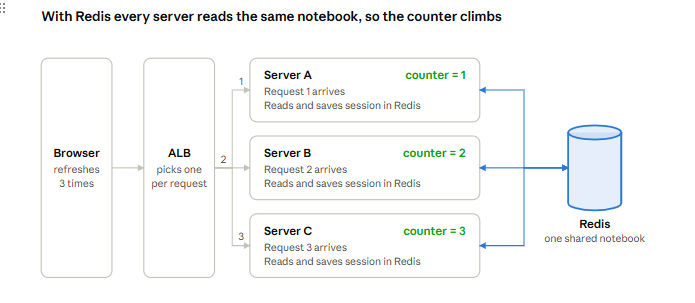
Now any server can answer. All of them read and update the same session in Redis, so the counter keeps going up.
2a. Change the app to use Redis
npm install redis connect-redis
Replace app.js with this. Notice there is only one session setup now, and it uses Redis:
import os from "os";
import express from "express";
import session from "express-session";
import { RedisStore } from "connect-redis";
import { createClient } from "redis";

const app = express();

// Connect to the shared Redis
const client = createClient({
  url: process.env.REDIS_URL || "redis://localhost:6379",
});
client.on("error", (err) => console.error("Redis error:", err));
await client.connect();

app.use(session({
  store: new RedisStore({ client }), // sessions now live in Redis
  secret: "my-super-secret-key",
  resave: false,
  saveUninitialized: true,
  cookie: { maxAge: 60000 }, // 1 minute
}));

app.get("/", (req, res) => {
  req.session.views = (req.session.views || 0) + 1;
  const host = os.hostname();
  console.log(`[${new Date().toISOString()}] handled by ${host}, views=${req.session.views}`);
  res.set("X-Server", host);
  res.send(`Visited ${req.session.views} times. (Server: ${host})`);
});

app.listen(3000, () => console.log("App running on port 3000"));
Important: Do not keep the old in-memory
app.use(session(...))block next to the Redis one. Two session setups in the same app will fight each other. Also callconnect()only once.
To test on your laptop, start a local Redis first:
docker run -d -p 6379:6379 redis:7-alpine
docker build -t your-dockerhub-username/my-session-app:v2 .
docker run -p 3000:3000 -e REDIS_URL=redis://host.docker.internal:6379 your-dockerhub-username/my-session-app:v2
2b. Add Redis to the CDK stack
Add this to the same stack file (do not create a new VPC or a separate stack, because the servers and Redis must live in the same network). Put it after webSg and before the launch template:
import * as elasticache from "aws-cdk-lib/aws-elasticache";

// Firewall for Redis: only our web servers may connect
const redisSg = new ec2.SecurityGroup(this, "RedisSg", {
  vpc,
  description: "Allow Redis from web servers only",
});
redisSg.addIngressRule(webSg, ec2.Port.tcp(6379), "Redis from web SG");

// The default VPC only has public subnets, so we use those.
// The security group is what keeps Redis private.
const subnetGroup = new elasticache.CfnSubnetGroup(this, "RedisSubnetGroup", {
  subnetIds: vpc.publicSubnets.map((s) => s.subnetId),
  description: "Subnet group for session Redis",
});

const redisCluster = new elasticache.CfnCacheCluster(this, "SessionRedisCluster", {
  engine: "redis",
  cacheNodeType: "cache.t3.micro",
  numCacheNodes: 1,
  vpcSecurityGroupIds: [redisSg.securityGroupId],
  cacheSubnetGroupName: subnetGroup.ref,
});
redisCluster.addDependency(subnetGroup);
Then update the user data so each container knows where Redis is, and use the new v2 image:
userData.addCommands(
  "dnf update -y",
  "dnf install -y docker",
  "systemctl start docker",
  "systemctl enable docker",
  `docker run -d -p 3000:3000 -e REDIS_URL=redis://${redisCluster.attrRedisEndpointAddress}:6379 your-dockerhub-username/my-session-app:v2`
);
If you named the subnet group class CfnCacheSubnetGroup in an older CDK version, keep that name.
2c. Build, push and deploy
docker build -t your-dockerhub-username/my-session-app:v2 .
docker push your-dockerhub-username/my-session-app:v2

cdk deploy --profile <profile-name>
Important: Pushing an image does not update servers that are already running. They pulled the image once, when they started. Because we changed the image tag to v2 in the user data, cdk deploy creates a new launch template version. Then start an instance refresh so the ASG replaces old servers with new ones:
aws autoscaling start-instance-refresh --auto-scaling-group-name <your-asg-name>
You can find the ASG name in the EC2 console. You can also just terminate the old instances and let the ASG start fresh ones.
Using a version tag (v1, v2, v3) instead of latest is a good habit. Every deploy is traceable, and rollback is as easy as pointing to the old tag.
Step 7: The Final Result
Remove stickinessCookieDuration (if you added it) so we know Redis is doing the work, then:
- Open the ALB URL in your browser.
- Refresh many times.
- The magic: the server name keeps changing, but the counter keeps going up: 1, 2, 3, 4...
The session no longer lives on any one server. Servers can come and go, and users do not notice. Our application layer is now stateless.
Sticky sessions vs Redis
| Sticky Sessions | Redis | |
|---|---|---|
| Setup effort | Very small | Medium |
| Survives a server crash | No | Yes |
| Survives scale-in | No | Yes |
| Traffic spread | Can be uneven | Even |
| Extra cost | None | Redis node |
Clean Up (Do Not Skip!)
This setup costs money while it is running (EC2, ALB, Redis). When you finish the demo:
cdk destroy --profile <profile-name>
Key Takeaways
- A load balancer sends each request to any server, so servers must not keep user state in their own memory.
- Local sessions work with one server but break when you scale out.
- Sticky sessions hide the problem. Shared storage like Redis solves it.
- Stateless servers are easy to scale, replace and recover.
Production note: Real apps should keep the session secret in AWS Secrets Manager or an environment variable, never in code. Production Redis should also use encryption in transit, and ideally a replica for high availability.
Ready to try AdvikPrep?
Practice with expert-curated exam sets, instant grading, and AI-driven insights. Free to start — no credit card required.