
CI/CD Masterclass: Next.js E-commerce App (Manager + Developer Workflow)
Shiv Srivastava
Product Architect & Founder · AdvikPrep
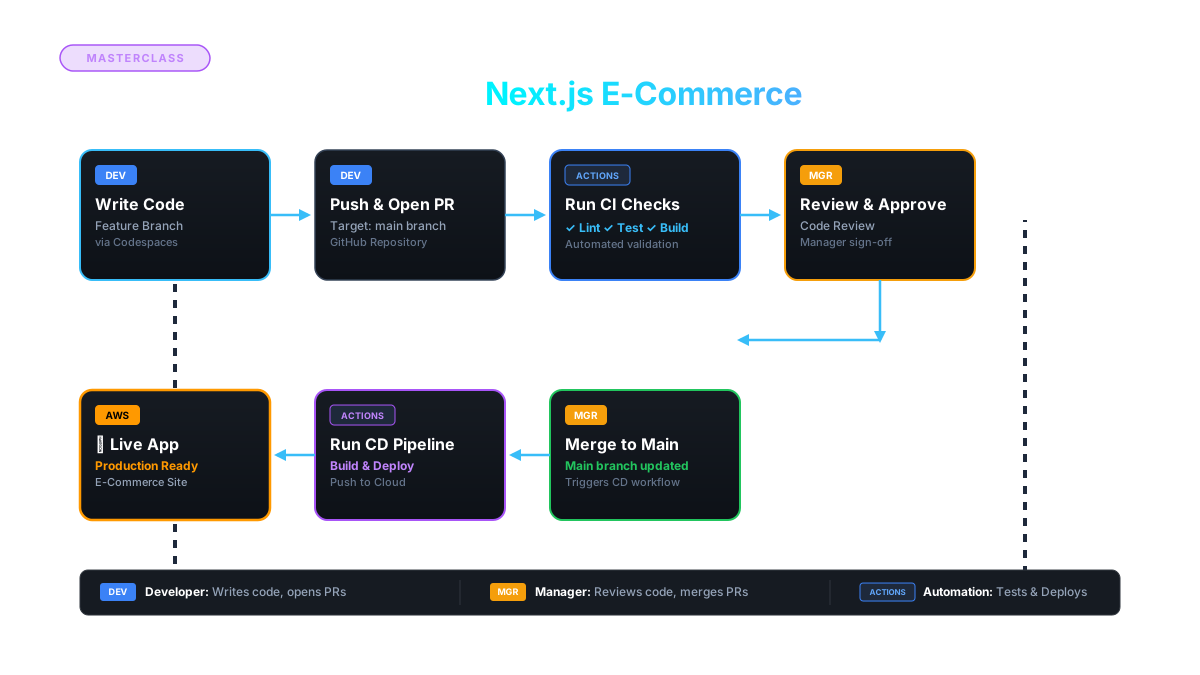
Stack: Next.js · GitHub · GitHub Actions · GitHub Codespaces · AWS Team: 2 GitHub accounts — Manager (MGR) and Developer (DEV) Goal: Take a learner from zero to a real, working CI/CD pipeline — basic version first, then advanced.
How to Use This Tutorial
- Follow the parts in order. Each part says who does it: [MGR] or [DEV].
- Every step has a 📝 Note — these are the things people get wrong in real jobs. Don't skip them.
- Part 1–10 = Basic pipeline (works end-to-end, deployable, good for teaching fundamentals).
- Part 11–14 = Advanced pipeline (production-grade: multi-env, secure auth, containers, rollback).
- Do this with two real GitHub accounts — one logged in as MGR, one as DEV (use two browser profiles or one normal + one incognito window).
Architecture Overview
DEV writes code in a feature branch (via Codespaces)
        │
        ▼
   Push to GitHub → Pull Request opened
        │
        ▼
GitHub Actions CI runs: lint → test → build   (on every PR)
        │
        ▼
   MGR reviews code → approves PR
        │
        ▼
   Merge to main
        │
        ▼
GitHub Actions CD runs: build → deploy to AWS
        │
        ▼
   Live e-commerce site on AWS
📝 Note: CI (Continuous Integration) = automatically testing/validating every code change. CD (Continuous Deployment) = automatically shipping validated code to a live environment. People often bundle both into one workflow file — that's normal and what we'll do here.
Part 0 — Prerequisites & Accounts
[MGR + DEV] both need:
- A GitHub account (free tier is enough). Enable Codespaces (free tier gives 60 hrs/month — plenty for learning).
- Node.js 20 LTS installed locally (for anyone testing outside Codespaces).
- Git configured (
git config --global user.name/user.email).
[MGR] additionally needs:
- An AWS account (free tier). Note down the AWS Account ID (top-right in AWS Console).
- AWS CLI v2 installed locally, configured with an admin IAM user for initial setup only (
aws configure).
📝 Note: Never use your AWS root account for daily work. Create an IAM user with AdministratorAccess for setup, and later we'll create a least-privilege deploy role (Part 12). This mirrors how real companies separate "setup access" from "CI/CD access."
Part 1 — [MGR] Create the Repository & Set Governance
- On GitHub → New repository → name it
nextjs-ecommerce-cicd→ keep it Private (mirrors real client work) → Initialize with aREADME.md. - Go to Settings → Collaborators → Invite the DEV GitHub account as a collaborator (Write access, not Admin).
- Go to Settings → Branches → Add a branch protection rule for
main:- ✅ Require a pull request before merging
- ✅ Require approvals (set to 1)
- ✅ Require status checks to pass before merging (we'll pick the CI check once it exists — come back to this after Part 5)
- ✅ Do not allow bypassing the above settings
📝 Note: Branch protection is the mechanism that forces the DEV → MGR review workflow. Without it, DEV could push straight to main and the whole point of the exercise disappears. This single setting is what most junior teams forget to configure.
Part 2 — [MGR] Scaffold the Next.js E-commerce App
Do this locally or in your own Codespace (as MGR), then push it — DEV will build features on top.
npx create-next-app@latest . --typescript --eslint --tailwind --app --src-dir --import-alias "@/*"
Add a minimal "e-commerce" shape so there's something real to build on:
src/
  app/
    page.tsx              # Home / product listing
    product/[id]/page.tsx # Product detail
    cart/page.tsx         # Cart page
  components/
    ProductCard.tsx
  lib/
    products.ts           # Mock product data (no DB needed for this course)
Add test tooling:
npm install -D jest @testing-library/react @testing-library/jest-dom jest-environment-jsdom
npx jest --init
Create one starter test so CI has something to run — e.g. src/components/ProductCard.test.tsx that renders ProductCard and asserts the product name shows up.
📝 Note: Keep the app deliberately simple (mock data, no real payment gateway) — the teaching subject here is CI/CD, not e-commerce. Adding Stripe or a real DB is a good "advanced" homework extension later, not a Part 1 requirement.
Commit and push to main:
git add .
git commit -m "chore: scaffold next.js e-commerce app with test setup"
git push origin main
Part 3 — [MGR] Configure GitHub Codespaces
Create .devcontainer/devcontainer.json in the repo root:
{
  "name": "nextjs-ecommerce-dev",
  "image": "mcr.microsoft.com/devcontainers/javascript-node:20",
  "postCreateCommand": "npm install",
  "forwardPorts": [3000],
  "customizations": {
    "vscode": {
      "extensions": [
        "dbaeumer.vscode-eslint",
        "esbenp.prettier-vscode",
        "orta.vscode-jest"
      ]
    }
  }
}
Commit this to main too.
📝 Note: This file is what makes Codespaces "just work" for DEV — no manual nvm install, no "works on my machine." Anyone who opens a Codespace on this repo gets an identical Node 20 environment automatically. This is a real interview talking point: "we standardized dev environments with devcontainers."
Part 4 — [MGR] Basic AWS Hosting Setup (AWS Amplify Hosting)
For the basic version, use AWS Amplify Hosting — it natively supports Next.js SSR/ISR and needs almost no infrastructure knowledge. (We'll do the advanced Docker/ECS route in Part 13.)
- AWS Console → Amplify → Create app → Host web app.
- Choose GitHub → authorize → select the
nextjs-ecommerce-cicdrepo → branchmain. - Amplify auto-detects Next.js build settings (
amplify.yml) — accept defaults:yamlversion: 1 frontend: phases: preBuild: commands: - npm ci build: commands: - npm run build artifacts: baseDirectory: .next files: - '**/*' cache: paths: - node_modules/**/* - Deploy. You'll get a live URL like
https://main.xxxxx.amplifyapp.com.
📝 Note: For this basic version, we're letting Amplify's own GitHub integration auto-deploy on push to main. In Part 6 we'll instead trigger deploys from GitHub Actions, which is what real teams do when they want deploy logic (tests-must-pass-first, Slack notification, etc.) instead of Amplify's default "deploy on every push."
📝 Note: Free tier covers this comfortably for a learning project — but set a billing alarm in AWS Budgets so a mistake doesn't surprise you.
Part 5 — [MGR] GitHub Actions: CI Workflow
Create .github/workflows/ci.yml:
name: CI

on:
  pull_request:
    branches: [main]

jobs:
  build-and-test:
    runs-on: ubuntu-latest
    steps:
      - uses: actions/checkout@v4

      - uses: actions/setup-node@v4
        with:
          node-version: 20
          cache: 'npm'

      - name: Install dependencies
        run: npm ci

      - name: Lint
        run: npm run lint

      - name: Run tests
        run: npm test -- --ci

      - name: Build
        run: npm run build
Push this to main, then go back to Settings → Branches (Part 1) and set the required status check to build-and-test.
📝 Note: This workflow triggers on pull_request, not on push to main. That's intentional — CI's job is to gate the PR before it merges. Confusing "runs on push" with "runs on PR" is the #1 beginner mistake.
📝 Note: npm ci (not npm install) inside CI — it installs exactly what's in package-lock.json, fails on mismatch, and is faster. Always use ci in pipelines, install locally.
Part 6 — [MGR] GitHub Actions: CD Workflow (Basic)
Create .github/workflows/cd.yml — this deploys to Amplify after CI has already passed and code is merged:
name: CD

on:
  push:
    branches: [main]

jobs:
  deploy:
    runs-on: ubuntu-latest
    steps:
      - uses: actions/checkout@v4

      - name: Trigger Amplify deployment
        run: |
          aws amplify start-job \
            --app-id ${{ secrets.AMPLIFY_APP_ID }} \
            --branch-name main \
            --job-type RELEASE
        env:
          AWS_ACCESS_KEY_ID: ${{ secrets.AWS_ACCESS_KEY_ID }}
          AWS_SECRET_ACCESS_KEY: ${{ secrets.AWS_SECRET_ACCESS_KEY }}
          AWS_DEFAULT_REGION: ${{ secrets.AWS_REGION }}
Add repo secrets: Settings → Secrets and variables → Actions:
AWS_ACCESS_KEY_ID,AWS_SECRET_ACCESS_KEY— from a dedicated IAM user with onlyamplify:StartJobpermission (not your admin user)AWS_REGION— e.g.ap-south-1AMPLIFY_APP_ID— from the Amplify console URL
📝 Note: This is the basic/teaching version using long-lived access keys. It works, but it's not how you'd do it in production — static keys sitting in GitHub Secrets are a real security liability if leaked. Part 12 replaces this with OIDC, which uses zero stored credentials. Teach it this way first so learners understand why OIDC matters later — the contrast is the lesson.
Part 7 — [DEV] Onboarding via Codespaces
- DEV accepts the collaborator invite (check email or GitHub notifications).
- On the repo page → green Code button → Codespaces tab → Create codespace on main.
- Wait for the devcontainer to build (uses the config from Part 3) — a full VS Code environment opens in the browser with dependencies already installed.
- Run
npm run devin the Codespace terminal, open the forwarded port 3000 preview.
📝 Note: DEV never installs Node, clones manually, or runs npm install by hand — that's the whole point of devcontainers. If a DEV is troubleshooting local environment issues instead of writing code, something in Part 3 was set up wrong.
Part 8 — [DEV] Feature Branch Workflow
git checkout -b feature/add-product-search
DEV builds a real feature — e.g. a search bar filtering the mock product list — and writes a test for it (this is non-negotiable in real teams: no test, no merge).
git add .
git commit -m "feat: add product search with client-side filtering"
git push origin feature/add-product-search
Open a Pull Request on GitHub targeting main, with a clear description of what changed and why.
📝 Note: Commit message convention matters more than beginners think — using feat:, fix:, chore:, test: prefixes (Conventional Commits) makes changelogs and release automation possible later (see Part 14). Start the habit now.
📝 Note: Watch the Checks tab on the PR — the CI workflow from Part 5 runs automatically. If lint/test/build fails, DEV fixes it and pushes again — no manager involvement needed yet. This is CI doing its job: catching problems before a human has to look.
Part 9 — [MGR] Code Review & Merge
- Open the PR → Files changed tab.
- Leave inline comments on specific lines (praise good patterns too — review isn't just criticism).
- Confirm the
CIcheck is green (required, per Part 1's branch protection). - Approve → Merge pull request (squash merge recommended for a clean
mainhistory).
📝 Note: Because of the branch protection rule from Part 1, GitHub physically won't let MGR merge if CI is red or if there's no approval — the rule isn't a suggestion, it's enforced. This is what "governance" means in practice, not just a policy doc nobody reads.
Part 10 — Merge → Auto Deploy → Verify
Once merged: the CD workflow (Part 6) fires automatically → Amplify redeploys → the live Amplify URL now shows DEV's search feature.
[MGR] verifies:
- GitHub Actions tab →
CDrun is green - Amplify console → new deployment shows "Deployed"
- Visit the live URL, confirm the feature works
📝 Note: This closes the loop: DEV never touched AWS directly, MGR never manually deployed — the pipeline did both. That separation (developers ship code, pipelines ship infrastructure changes) is the core idea of CI/CD, and now your learners have built, not just read about, it.
Advanced Track
Everything below upgrades the basic pipeline toward what real production teams run. Do these roughly in order.
Part 11 — [MGR] Multi-Environment: staging + production
- In Amplify, add a second branch mapping: create a
developbranch in GitHub, connect it in Amplify as a separate environment (gives you adevelop.xxxxx.amplifyapp.comstaging URL). - In GitHub → Settings → Environments, create
stagingandproductionenvironments. - On
production, add a required reviewer (MGR) — even after PR approval, deploying to prod needs a second explicit human click. - Update
cd.ymlto target environment based on branch:
on:
  push:
    branches: [main, develop]

jobs:
  deploy:
    runs-on: ubuntu-latest
    environment: ${{ github.ref_name == 'main' && 'production' || 'staging' }}
    steps:
      - uses: actions/checkout@v4
      - name: Deploy
        run: |
          aws amplify start-job \
            --app-id ${{ secrets.AMPLIFY_APP_ID }} \
            --branch-name ${{ github.ref_name }} \
            --job-type RELEASE
📝 Note: DEV workflow changes slightly: feature branches now PR into develop first (auto-deploys to staging for QA), and periodically develop is PR'd into main (deploys to prod, with the required-reviewer gate). This is the classic git-flow-lite pattern used by most small teams.
Part 12 — [MGR] Secure AWS Auth with OIDC (remove static keys)
Replace the long-lived AWS_ACCESS_KEY_ID/AWS_SECRET_ACCESS_KEY secrets with GitHub's OIDC provider — GitHub Actions requests a short-lived token, AWS trusts it, no stored credentials anywhere.
- AWS Console → IAM → Identity providers → Add provider → OpenID Connect:
- Provider URL:
https://token.actions.githubusercontent.com - Audience:
sts.amazonaws.com
- Provider URL:
- Create an IAM role
github-actions-deploy-rolewith a trust policy scoped to your repo:
{
  "Version": "2012-10-17",
  "Statement": [{
    "Effect": "Allow",
    "Principal": { "Federated": "arn:aws:iam::<ACCOUNT_ID>:oidc-provider/token.actions.githubusercontent.com" },
    "Action": "sts:AssumeRoleWithWebIdentity",
    "Condition": {
      "StringEquals": { "token.actions.githubusercontent.com:aud": "sts.amazonaws.com" },
      "StringLike": { "token.actions.githubusercontent.com:sub": "repo:<your-org>/nextjs-ecommerce-cicd:*" }
    }
  }]
}
- Attach a least-privilege policy (only
amplify:StartJobon your specific Amplify app ARN — notAdministratorAccess). - Update the workflow:
permissions:
  id-token: write
  contents: read

jobs:
  deploy:
    runs-on: ubuntu-latest
    steps:
      - uses: actions/checkout@v4
      - uses: aws-actions/configure-aws-credentials@v4
        with:
          role-to-assume: arn:aws:iam::<ACCOUNT_ID>:role/github-actions-deploy-role
          aws-region: ap-south-1
      - run: aws amplify start-job --app-id ${{ secrets.AMPLIFY_APP_ID }} --branch-name main --job-type RELEASE
- Delete the
AWS_ACCESS_KEY_ID/AWS_SECRET_ACCESS_KEYsecrets — no longer needed.
📝 Note: This is the single highest-value "advanced" lesson in this tutorial. Static AWS keys in CI secrets are one of the most common real-world breach vectors (a leaked key = full account access until rotated). OIDC issues a token valid for one job run only. Any hiring manager will recognize this as senior-level pipeline hygiene.
Part 13 — [MGR] Containerize & Deploy via ECR + ECS Fargate
For teams that outgrow Amplify (need custom Node middleware, WebSockets, more infra control), containerize instead.
Dockerfile:
FROM node:20-alpine AS builder
WORKDIR /app
COPY package*.json ./
RUN npm ci
COPY . .
RUN npm run build

FROM node:20-alpine
WORKDIR /app
ENV NODE_ENV=production
COPY --from=builder /app/next.config.js ./
COPY --from=builder /app/public ./public
COPY --from=builder /app/.next ./.next
COPY --from=builder /app/node_modules ./node_modules
COPY --from=builder /app/package.json ./package.json
EXPOSE 3000
CMD ["npm", "start"]
Infra (one-time, [MGR]):
- Create an ECR repository for the image.
- Create an ECS Fargate cluster + service behind an Application Load Balancer.
Pipeline addition to cd.yml (using the OIDC role from Part 12, extended with ECR/ECS permissions):
- name: Build and push image
  run: |
    aws ecr get-login-password --region ap-south-1 | docker login --username AWS --password-stdin <ACCOUNT_ID>.dkr.ecr.ap-south-1.amazonaws.com
    docker build -t nextjs-ecommerce .
    docker tag nextjs-ecommerce:latest <ACCOUNT_ID>.dkr.ecr.ap-south-1.amazonaws.com/nextjs-ecommerce:${{ github.sha }}
    docker push <ACCOUNT_ID>.dkr.ecr.ap-south-1.amazonaws.com/nextjs-ecommerce:${{ github.sha }}

- name: Deploy new task definition
  run: |
    aws ecs update-service --cluster nextjs-ecommerce-cluster --service nextjs-ecommerce-service --force-new-deployment
📝 Note: Tag images with ${{ github.sha }}, never latest, in any real pipeline — it gives you an exact, traceable artifact per deploy and makes rollback (next section) trivial: redeploy the previous SHA's image.
Part 14 — [MGR] Rollback, Monitoring, Alerts
- Rollback (Amplify): Amplify console → Deployments → pick a previous successful build → Redeploy this version.
- Rollback (ECS): re-point the service to the previous image tag (the SHA) and force a new deployment.
- Monitoring: enable CloudWatch Logs for Amplify/ECS; set a CloudWatch Alarm on 5xx error rate or failed health checks.
- Alerts: wire the alarm to an SNS topic → email, or post CI/CD pipeline results to Slack via a webhook step in the workflow.
📝 Note: A pipeline without a rollback plan is a pipeline that will eventually cause a bad Friday. Teach learners to always ask "if this deploy breaks prod, what's the one command to undo it?" — and to know the answer before they need it.
Cheat Sheet: Roles Recap
| Task | Who |
|---|---|
| Create repo, branch protection, secrets | MGR |
| Configure Codespaces, Amplify/AWS infra | MGR |
| Write CI/CD workflow YAML | MGR |
| Write feature code + unit tests | DEV |
| Open PRs, respond to review comments | DEV |
| Approve & merge PRs | MGR |
| Monitor deploys, handle rollback | MGR |
Suggested Teaching Order (for a course/YouTube series)
- Ep 1 — Repo setup + branch protection (Part 1)
- Ep 2 — Scaffold app + Codespaces (Parts 2–3, 7)
- Ep 3 — First CI workflow, watch it fail then pass (Part 5)
- Ep 4 — Deploy manually to Amplify, then automate with CD (Parts 4, 6, 10)
- Ep 5 — Full DEV→MGR PR cycle end-to-end (Parts 8–9)
- Ep 6 (advanced) — Multi-env + required reviewers (Part 11)
- Ep 7 (advanced) — OIDC, kill the static keys (Part 12) ← strongest "aha" moment for viewers
- Ep 8 (advanced) — Docker + ECS migration (Part 13)
- Ep 9 (advanced) — Rollback drill: intentionally break prod, then fix it live (Part 14)
Ready to try AdvikPrep?
Practice with expert-curated exam sets, instant grading, and AI-driven insights. Free to start — no credit card required.